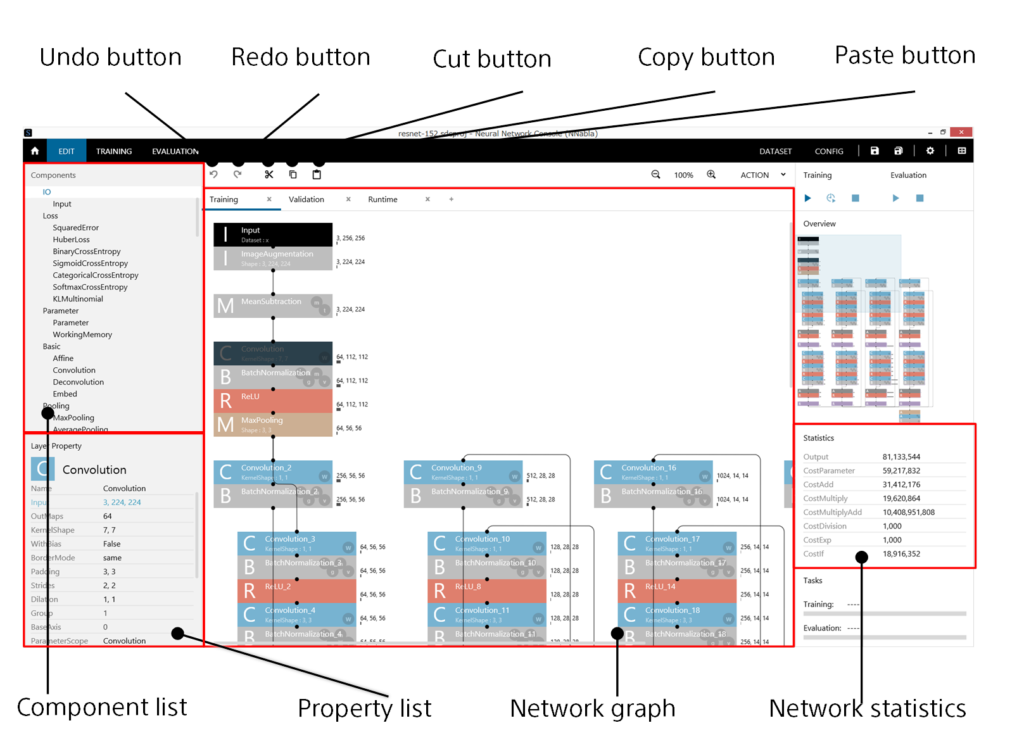
The EDIT tab is used to edit the network structure of a neural network used for training.
Neural Network Console expresses neural network structures using a combination of predefined components (functions) called layers.
1 Adding a new layer to the network graph
Option 1: drag the layer you want to add to the network graph from the component list on the left side of the EDIT tab.
Option 2: double-click the layer on the component list.
Option 3: click the layer on the component list or select it using the up and down arrow keys, and then press Enter on the keyboard.
Option 4: click the layer on the component list or select it using the up and down arrow keys, and then double-click the network graph.
Reference
If you add a layer by double-clicking on the component list or by pressing Enter when a layer is selected on the network graph, the new layer is automatically linked to the selected layer.
2 Selecting a single layer
Option 1: click a layer on the network graph.
Option 2: click the network graph, and then move to the target layer using the arrow keys.
3 Selecting several layers
Option 1: While holding down the Ctrl key, click layers on the network graph.
Option 2: Select the first layer, and then use the arrow keys while holding down the Ctrl key.
Option 3: Click an empty area on the network graph, and drag the mouse pointer to select a range of layers.
4 Selecting all layers
Option 1: Right-click the network graph to open a shortcut menu, and click Select All.
Option 2: Press Ctrl+A on the keyboard.
5 Inverting the layer selection
Right-click the network graph to open a shortcut menu, and click Inverse Layer Selection.
6 Clearing the layer selection
Option 1: Click an area that is not a layer or link on the network graph.
Option 2: right-click the network graph to open a shortcut menu, and then click Clear Selection.
Option 3: press Esc on the keyboard.
7 Moving the layer coordinates
- Select the layer you want to move.
- Drag the layer to move it.
8 Deleting a layer
- Select the layer you want to delete.
- Right-click the network graph to open a shortcut menu, and click Delete.
- Alternatively, press Delete on the keyboard.
Notes
When you delete a layer, the link connected to the layer is also deleted.
9 Inserting a new layer at an existing layer position
- Click the layer on the component list or select it using the up and down arrow keys.
- On the network graph, select the layer where you want to insert the selected layer into.
- Press Insert on the keyboard.
10 Deleting a layer while retaining the link structure
- Select the layer you want to delete.
- Press the Backspace key on the keyboard.
11 Connecting (linking) two layers
Option 1: On the network graph, drag the link destination layer just below the link source layer.
Option 2: Drag the output pin of the link source layer to the input pin of the link destination layer.
Option 3: Select the link source layer, and then while holding down the Shift key, click the link destination layer.
12 Changing the link destination
On the network graph, drag the link you want to change.
Reference
You can change the link source layer by dragging the end of the link on the output pin side and the link destination layer by dragging the end of the link on the input pin side.
13 Selecting a link
Click a link on the network graph.
14 Deleting a link
- Select the link you want to delete.
- Right-click the network graph to open a shortcut menu, and click Delete.
- Alternatively, press Delete on the keyboard.
15 Undoing past edits
Option 1: Click the Undo button at the top of the window.
Option 2: right-click the network graph to open a shortcut menu, and click Undo.
Option 3: press Ctrl+Z on the keyboard.
Reference
Neural Network Console keeps memory of the last 100 edits (i.e.: you can undo up to 100 edits)
16 Redoing edits that have been undone
Option 1: Click the Redo button at the top of the window.
Option 2: right-click the network graph to open a shortcut menu, and click Redo.
Option 3: press Ctrl+Y on the keyboard.
Option 4: press Ctrl+Shift+Z on the keyboard.
Notes
If you perform any edits other than undo, you will not be able to redo past edits.
17 Cutting a layer into the clipboard
- Select the layer you want to cut.
- Click the Cut button at the top of the window.Alternatively, press Ctrl+X on the keyboard.
- Alternatively, right-click the network graph to open a shortcut menu, and click Cut.
18 Copying a layer into the clipboard
- Select the layer you want to copy.
- Click the Copy button at the top of the window.Alternatively, press Ctrl+C on the keyboard.
- Alternatively, right-click the network graph to open a shortcut menu, and click Copy.
19 Pasting a layer from the clipboard
Option 1: Click the Paste button at the top of the window.
Option 2: right-click the network graph to open a shortcut menu, and click Paste.
Option 3: press Ctrl+V on the keyboard.
20 Automatically arranging layers
Right-click the network graph to open a shortcut menu, and click Arrange Layers.
21 Moving the display range of the network graph
Option 1: Drag the scroll bar shown at the right and at the bottom of the network graph.
Option 2: use the mouse wheel. Rotate only the mouse wheel to scroll vertically. Rotate the mouse wheel while holding down Shift to scroll horizontally.
22 Zooming the network graph display
- Click the network graph.
- While holding down Ctrl, rotate the mouse wheel.
- Alternatively, right-click the network graph to open a shortcut menu, and click Zoom and then Zoom In or Zoom Out.
- Alternatively, while holding down Ctrl, press the plus (+) or minus (-) key.
23 Resetting the zoom ratio of the network graph display to default
- Click the network graph.
- While holding down Ctrl, press the 0 (zero) key.
Alternatively, right-click the network graph to open a shortcut menu, and click Zoom and then Default.
24 Editing layer properties
- Select one or more layers that you want to edit the properties of.
- Of the properties shown in the Property list, click the value of the property you want to edit.
- Or, click the Property list, move to the target property using the arrow keys, and press Enter.
- For properties that require you to enter a string, type the value from the keyboard. For properties that you select from the available options, select the value using the mouse or the up and down arrow keys.
- Editing ends when you move to a different editing task, press Enter, or press ESC.
For property values, you can specify the following values in addition to normal values and character strings.
| Property value | Description | Examples |
| * (asterisk)+another property name | The value of another property in the same layer is copied and used. | l Set the OutShape property of the Affine layer to “*Input” in order to set the output size to the same size as the input. |
| * (asterisk)+argument layer name | The Value property value in the argument layer with the specified name in the current network is copied and used. | Prepare an argument layer named ConvKernel, and set Kernel Shape of multiple convolution layers to “*ConvKernel”. This allows KernelShape of the multiple convolution layers to be specified by editing the Value property of the argument layer. |
| Expression, comma-separated expression | Arithmetic operations and arithmetic operations constructed with parentheses can be used.
Other properties of the same layer and argument layers can be used as variables in expressions. When the variable is an array, the bracket operator can be used to specify the index of an array element. |
Set OutMaps of a convolution layer to “Input[0]*2” in order to make OutMaps twice the number of input maps.
Set Padding of a convolution layer to “KernelShape[0]/2,KernelShape[1]/2” in order to make Padding half KernelShape. |
Notes
Edits are applied immediately when you enter a value (they are applied before you press Enter). If you want to restore the value to its original value, use the undo function.
Notes
Editable properties appear in black color. Other property values are automatically calculated based on the layer link status or other property values.
Notes
A warning mark appears on the right side of the Property list, for properties set to invalid values or for those in conflict (as a result of linking to other layers). In addition, on the Network graph, a warning mark appears in the top right of a layer that has properties in conflict. In such circumstances, you need to review the layer links, or correct the property values.
25 Editing the properties of multiple layers collectively
Edit the properties while multiple layers are selected.
When you enter a value in a property, the values of the properties with the same name on all selected layers will be changed.
26 Viewing the amount of memory and calculation each layer needs
- Select the layer you want to view the needed amount of memory and calculation for.
- View the following values in the Property list.
| Item | Description |
| CostParameter | Total number of parameters that the layer has |
| CostAdd | Number of additions that the layer needs for calculation |
| CostMultiply | Number of multiplications that the layer needs for calculation |
| CostMultiplyAdd | Number of multiplications and additions that the layer needs for calculation |
| CostDivision | Number of divisions that the layer needs for calculation |
| CostExp | Number of exponentiations that the layer needs for calculation |
| CostIf | Number of conditional branching decisions that the layer needs for calculation |
Reference
Items that never need any amount of memory or calculation do not appear in the Property list.
27 Viewing the statistics of the entire network
View the network statistics in the right of the EDIT tab.
Network statistics show the following statistics.
| Item | Description |
| Output | Number of intermediate calculated values (buffers) that need to be retained in the calculation process |
| CostParameter | Total number of parameters that the whole neural network has |
| CostAdd | Number of additions needed in a single neural network calculation |
| CostMultiply | Number of multiplications needed in a single neural network calculation |
| CostMultiplyAdd | Number of multiplications and additions needed in a single neural network calculation |
| CostDivision | Number of divisions needed in a single neural network calculation |
| CostExp | Number of exponentiations needed in a single neural network calculation |
| CostIf | Number of conditional branching decisions needed in a single neural network calculation |
28 Viewing specific statistics in detail
Option 1: Under Network Statistics, click the statistic that you want to view in detail.
Option 2: click Network Statistics, and then select the type of network statistics using the up and down arrow keys.
Option 3: select the statistics property from the Property list.
The percentage that the selected statistic occupies in each layer is shown to the right of the layer on the Network graph.
Reference
If no statistic is selected, the Output information is shown to the right of each layer by default.
29 Saving the network being edited in a file as an image
- Right-click the network graph to open a shortcut menu, and click Import->nntxt beta.
- Specify the nntxt file to load.
30 Loading an nntxt file (beta)
- Right-click the network graph to open a shortcut menu, and click Save Network Bitmap.
- Specify the save destination and the image file name.
31 Loading a network from Caffe prototxt (beta)
- Right-click the network graph to open a shortcut menu, and click Import->prototxt (Caffe) beta.
- Specify the prototxt file to load.
Notes
Out of the information written in prototxt, Neural Network Console loads only the information that is compatible with Neural Network Console and discards any other information. Layers not supported by Neural Network Console are loaded as unsupported layers. Unsupported layers are dummy layers that are made available just for viewing their information and must be deleted before training is executed.
32 Exporting a network in Caffe prototxt format (beta)
- Right-click the network graph to open a shortcut menu, and click Export->prototxt (Caffe) beta.
- Specify the prototxt file to export to.
Notes
Out of the available network information, Neural Network Console exports only the information that is compatible with prototxt and discards any other information. To perform training on Caffe using the exported prototxt, additional information needed in training on Caffe must be included.
33 Adding additional network structures to a project
Click the “+” button at the top of the network graph.
34 Changing the network structure you want to edit
Click the appropriate tab at the top of the network graph.
Notes
In all network structures in a project, layers with the same name must have the same properties, with some exceptions. During training and evaluation, layers and parameters with the same name are shared between all network structures.
35 Changing a network structure name
- Click the appropriate tab at the top of the network graph.
- Click the tab name, and then click it again.
- Type the network structure name, and press Enter.
Notes
The name of the main network structure is “Main.” If you specify “Main” for a network structure name, a validation network structure “MainValidation” and runtime network structure “MainRuntime” are automatically generated based on the training neural network that you designed. If you specify a name other than “Main,” you will need to set the training, validation, and runtime network structures separately.
36 Deleting a network structure from a project
At the top of the network graph, click the “x” button at the right of the network structure tab you want to delete.